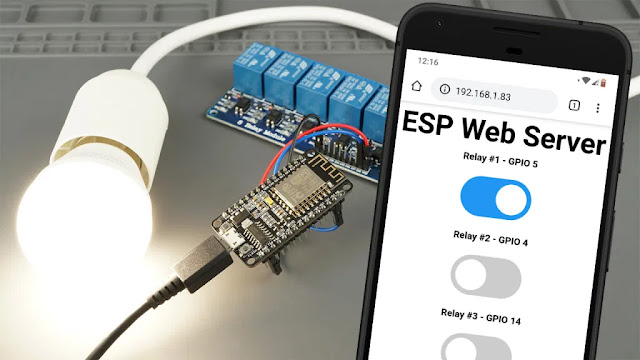
Using a relay with the ESP8266 is a great way to control AC household appliances remotely. This tutorial explains how to control a relay module with the ESP8266 NodeMCU. We’ll take a look at how a relay module works, how to connect the relay to the ESP8266 and build a web server to control a relay remotely (or as many relays as you want).
Controlling a Relay Module with the ESP8266 NodeMCU – Arduino Sketch
The code to control a relay with the ESP8266 is as simple as controlling an LED or any other output. In this example, as we’re using a normally open configuration, we need to send a LOW signal to let the current flow, and a HIGH signal to stop the current flow.
const int relay = 5;

void setup() {
  Serial.begin(115200);
  pinMode(relay, OUTPUT);
}

void loop() {
  // Normally Open configuration, send LOW signal to let current flow
  // (if you're usong Normally Closed configuration send HIGH signal)
  digitalWrite(relay, LOW);
  Serial.println("Current Flowing");
  delay(5000);

  // Normally Open configuration, send HIGH signal stop current flow
  // (if you're usong Normally Closed configuration send LOW signal)
  digitalWrite(relay, HIGH);
  Serial.println("Current not Flowing");
  delay(5000);
}
Installing the ESPAsyncTCP Library for ESP8266
The ESPAsyncWebServer library requires the ESPAsyncTCP library to work. Follow the next steps to install that library:
- Click here to download the ESPAsyncTCP library. You should have a .zip folder in your Downloads folder
- Unzip the .zip folder and you should get ESPAsyncTCP-master folder
- Rename your folder from
ESPAsyncTCP-master to ESPAsyncTCP - Move the ESPAsyncTCP folder to your Arduino IDE installation libraries folder
- Finally, re-open your Arduino IDE
Alternatively, in your Arduino IDE, you can go to Sketch > Include Library > Add .ZIP library… and select the library you’ve just downloaded.
// Import required libraries
#include "ESP8266WiFi.h"
#include "ESPAsyncWebServer.h"
// Set to true to define Relay as Normally Open (NO)
#define RELAY_NO true
// Set number of relays
#define NUM_RELAYS 5
// Assign each GPIO to a relay
int relayGPIOs[NUM_RELAYS] = {5, 4, 14, 12, 13};
// Replace with your network credentials
const char* ssid = "REPLACE_WITH_YOUR_SSID";
const char* password = "REPLACE_WITH_YOUR_PASSWORD";
const char* PARAM_INPUT_1 = "relay";
const char* PARAM_INPUT_2 = "state";
// Create AsyncWebServer object on port 80
AsyncWebServer server(80);
const char index_html[] PROGMEM = R"rawliteral(
<!DOCTYPE HTML><html>
<head>
<meta name="viewport" content="width=device-width, initial-scale=1">
<style>
html {font-family: Arial; display: inline-block; text-align: center;}
h2 {font-size: 3.0rem;}
p {font-size: 3.0rem;}
body {max-width: 600px; margin:0px auto; padding-bottom: 25px;}
.switch {position: relative; display: inline-block; width: 120px; height: 68px}
.switch input {display: none}
.slider {position: absolute; top: 0; left: 0; right: 0; bottom: 0; background-color: #ccc; border-radius: 34px}
.slider:before {position: absolute; content: ""; height: 52px; width: 52px; left: 8px; bottom: 8px; background-color: #fff; -webkit-transition: .4s; transition: .4s; border-radius: 68px}
input:checked+.slider {background-color: #2196F3}
input:checked+.slider:before {-webkit-transform: translateX(52px); -ms-transform: translateX(52px); transform: translateX(52px)}
</style>
</head>
<body>
<h2>ESP Web Server</h2>
%BUTTONPLACEHOLDER%
<script>function toggleCheckbox(element) {
var xhr = new XMLHttpRequest();
if(element.checked){ xhr.open("GET", "/update?relay="+element.id+"&state=1", true); }
else { xhr.open("GET", "/update?relay="+element.id+"&state=0", true); }
xhr.send();
}</script>
</body>
</html>
)rawliteral";
// Replaces placeholder with button section in your web page
String processor(const String& var){
//Serial.println(var);
if(var == "BUTTONPLACEHOLDER"){
String buttons ="";
for(int i=1; i<=NUM_RELAYS; i++){
String relayStateValue = relayState(i);
buttons+= "<h4>Relay #" + String(i) + " - GPIO " + relayGPIOs[i-1] + "</h4><label class=\"switch\"><input type=\"checkbox\" onchange=\"toggleCheckbox(this)\" id=\"" + String(i) + "\" "+ relayStateValue +"><span class=\"slider\"></span></label>";
}
return buttons;
}
return String();
}
String relayState(int numRelay){
if(RELAY_NO){
if(digitalRead(relayGPIOs[numRelay-1])){
return "";
}
else {
return "checked";
}
}
else {
if(digitalRead(relayGPIOs[numRelay-1])){
return "checked";
}
else {
return "";
}
}
return "";
}
void setup(){
// Serial port for debugging purposes
Serial.begin(115200);
// Set all relays to off when the program starts - if set to Normally Open (NO), the relay is off when you set the relay to HIGH
for(int i=1; i<=NUM_RELAYS; i++){
pinMode(relayGPIOs[i-1], OUTPUT);
if(RELAY_NO){
digitalWrite(relayGPIOs[i-1], HIGH);
}
else{
digitalWrite(relayGPIOs[i-1], LOW);
}
}
// Connect to Wi-Fi
WiFi.begin(ssid, password);
while (WiFi.status() != WL_CONNECTED) {
delay(1000);
Serial.println("Connecting to WiFi..");
}
// Print ESP8266 Local IP Address
Serial.println(WiFi.localIP());
// Route for root / web page
server.on("/", HTTP_GET, [](AsyncWebServerRequest *request){
request->send_P(200, "text/html", index_html, processor);
});
// Send a GET request to <ESP_IP>/update?relay=<inputMessage>&state=<inputMessage2>
server.on("/update", HTTP_GET, [] (AsyncWebServerRequest *request) {
String inputMessage;
String inputParam;
String inputMessage2;
String inputParam2;
// GET input1 value on <ESP_IP>/update?relay=<inputMessage>
if (request->hasParam(PARAM_INPUT_1) & request->hasParam(PARAM_INPUT_2)) {
inputMessage = request->getParam(PARAM_INPUT_1)->value();
inputParam = PARAM_INPUT_1;
inputMessage2 = request->getParam(PARAM_INPUT_2)->value();
inputParam2 = PARAM_INPUT_2;
if(RELAY_NO){
Serial.print("NO ");
digitalWrite(relayGPIOs[inputMessage.toInt()-1], !inputMessage2.toInt());
}
else{
Serial.print("NC ");
digitalWrite(relayGPIOs[inputMessage.toInt()-1], inputMessage2.toInt());
}
}
else {
inputMessage = "No message sent";
inputParam = "none";
}
Serial.println(inputMessage + inputMessage2);
request->send(200, "text/plain", "OK");
});
// Start server
server.begin();
}
void loop() {
}
See the video : https://www.youtube.com/watch?v=giACxpN0cGc


No comments:
Post a Comment